Case whitening: Difference between revisions
Jump to navigation
Jump to search
mNo edit summary |
m (→Process) |
||
| (9 intermediate revisions by the same user not shown) | |||
| Line 1: | Line 1: | ||
The plastic case of the Dreamcast is prone to yellowing, but there are products available to help whiten it. | The plastic case of the Dreamcast is prone to yellowing, but there are products available to help whiten it. | ||
== Retro-Brite == | == Why Dreamcast Plastic Yellows == | ||
[https://retro-brite.com/ Retro-Brite] is a spray-on gel. Do the following to whiten | |||
Dreamcast cases are made from ABS, and ABS is known for turning yellow when exposed to UV of sunlight and/or excessive heat.<ref name="retrobright">''[https://en.wikipedia.org/wiki/Retr0bright] Retr0bright Wiki''</ref> The yellow color becomes more apparent because the standard base color of the plastic is a light gray which contrasts against the yellow. | |||
== Products == | |||
=== Retr0bright === | |||
The DIY Retr0bright solution consist of hydrogen peroxide and a TAED-based laundry booster.<ref name="retrobright"/><ref>''[https://www.retr0bright.com/make.html] Retr0bright make''</ref> | |||
=== Retro-Brite === | |||
[https://retro-brite.com/ Retro-Brite] is a spray-on gel which may be purchased from Amazon. | |||
== Process == | |||
Do the following to whiten a Dreamcast case: | |||
# Disassemble the plastic case into the bottom shell, top shell, CD lid, controller port cover, and buttons; set aside all electronics | # Disassemble the plastic case into the bottom shell, top shell, CD lid, controller port cover, and buttons; set aside all electronics | ||
# Carefully remove the Dreamcast logo sticker from the lid | # Carefully remove the Dreamcast logo sticker from the lid and labels on the bottom, if desired | ||
# Put on gloves and spray down every exposed surface of all of the plastic pieces | ## The whitening process WILL discolor stickers if they aren't removed | ||
# Put each plastic piece into one or more plastic bags so that the yellowed surfaces are all | # Put on gloves and spray down every exposed surface of all of the plastic pieces with the whitening solution | ||
# Leave the bag(s) in full sun or under a UV light for 8 to 24 hours, checking on their progress every few hours | # Put each plastic piece into one or more plastic bags or some other clear, enclosed container so that the yellowed surfaces are all facing upwards | ||
# Leave the bag(s)/container in full sun on warm days or under a UV light in a warm area for 8 to 24 hours of exposure, checking on their progress every few hours | |||
# Remove all pieces from bag(s), rinse with tap water, and let dry | # Remove all pieces from bag(s), rinse with tap water, and let dry | ||
# | # The process may be repeated if more whitening is desired | ||
# Once satisfied, reassemble your Dreamcast and reattach logo sticker and labels | |||
<br> | <br> | ||
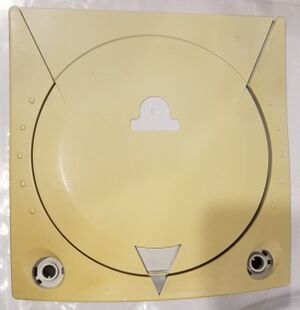
[[File:Yellowed Dreamcast.jpg|frameless|Yellowed Dreamcast]] -> | [[File:Yellowed Dreamcast.jpg|frameless|Yellowed Dreamcast]] -> | ||
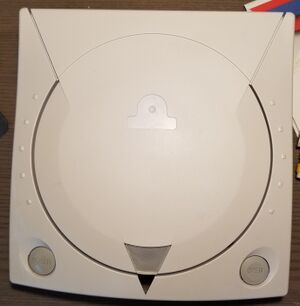
[[File:Whitened Dreamcast.jpg|frameless|Whitened Dreamcast]] | [[File:Whitened Dreamcast.jpg|frameless|Whitened Dreamcast]] | ||
<br> | <br> | ||
== References == | |||
<references /> | |||
Latest revision as of 14:34, 4 January 2023
The plastic case of the Dreamcast is prone to yellowing, but there are products available to help whiten it.
Why Dreamcast Plastic Yellows
Dreamcast cases are made from ABS, and ABS is known for turning yellow when exposed to UV of sunlight and/or excessive heat.[1] The yellow color becomes more apparent because the standard base color of the plastic is a light gray which contrasts against the yellow.
Products
Retr0bright
The DIY Retr0bright solution consist of hydrogen peroxide and a TAED-based laundry booster.[1][2]
Retro-Brite
Retro-Brite is a spray-on gel which may be purchased from Amazon.
Process
Do the following to whiten a Dreamcast case:
- Disassemble the plastic case into the bottom shell, top shell, CD lid, controller port cover, and buttons; set aside all electronics
- Carefully remove the Dreamcast logo sticker from the lid and labels on the bottom, if desired
- The whitening process WILL discolor stickers if they aren't removed
- Put on gloves and spray down every exposed surface of all of the plastic pieces with the whitening solution
- Put each plastic piece into one or more plastic bags or some other clear, enclosed container so that the yellowed surfaces are all facing upwards
- Leave the bag(s)/container in full sun on warm days or under a UV light in a warm area for 8 to 24 hours of exposure, checking on their progress every few hours
- Remove all pieces from bag(s), rinse with tap water, and let dry
- The process may be repeated if more whitening is desired
- Once satisfied, reassemble your Dreamcast and reattach logo sticker and labels

