0GDTEX.PVR: Difference between revisions
Jump to navigation
Jump to search
(Created page with "== Info == == Creation Tutorial == Author: HaydenKow Source: [https://www.reddit.com/r/dreamcast/comments/aa3uq1/question_adding_artwork_to_a_gdi_image/ecpmp52/ Reddit Po...") |
No edit summary |
||
| (2 intermediate revisions by the same user not shown) | |||
| Line 3: | Line 3: | ||
== Creation Tutorial == | == Creation Tutorial == | ||
Author: [[HaydenKow]] | Author: [[HaydenKow]] | ||
Source: [https://www.reddit.com/r/dreamcast/comments/aa3uq1/question_adding_artwork_to_a_gdi_image/ecpmp52/ Reddit Post] | Source: [https://www.reddit.com/r/dreamcast/comments/aa3uq1/question_adding_artwork_to_a_gdi_image/ecpmp52/ Reddit Post] | ||
Files: [[:File:0GDTEX Creation Tool.7z|0GDTEX Creation Tool.7z]] | |||
|border|50px | |||
'''Video Overview from Super Retrocade''' | |||
* watch this for an overview and the basic how to for the whole thing | |||
::- [https://www.youtube.com/watch?v=GxXO2OtHv9o How to add album art to GDEMU (YouTube)] | |||
::- It will absolutely work, and is a solid good with easy to find tools. | |||
<br> | |||
# Find | '''Making a better quality PVR Image using photoshop''' | ||
# Resize to 256x256 : [ | ::- Note: using the way discussed in the video above will give decent to find results but this gives you better control | ||
# Split channels: [ | # Find an image and get it in photoshop : [[File:0gdtex_tut_1.jpg|frameless|border]] | ||
# Press Alt + Shift + Ctrl + S or Save for Web (Legacy): [ | # Resize to 256x256 : [[File:0gdtex_tut_2.png|frameless|border]] | ||
# Split channels: [[File:0gdtex_tut_3.png|frameless|border]] what you should get [[File:0gdtex_tut_4.png|frameless|border]] | |||
# Press Alt + Shift + Ctrl + S or Save for Web (Legacy): [[File:0gdtex_tut_5.png|frameless|border]] | |||
Merge Back : | #* For each channel, but should do it for all just doing it once. | ||
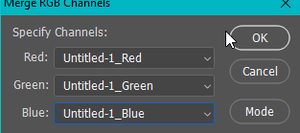
Change to RGB, 3 Channel : | # Merge Back : [[File:0gdtex_tut_6.png|frameless|border]] | ||
Make sure this looks correct and not stupid: | # Change to RGB, 3 Channel : [[File:0gdtex_tut_7.png|frameless|border]] | ||
Back in business! : | # Make sure this looks correct and not stupid: [[File:0gdtex_tut_8.png|frameless|border]] | ||
Save as BMP : | # Back in business! : [[File:0gdtex_tut_9.png|frameless|border]] | ||
Normal, dont go crazy : | # Save as BMP : [[File:0gdtex_tut_10.png|frameless|border]] | ||
Now you have all this : | # Normal, dont go crazy : [[File:0gdtex_tut_11.png|frameless|border]] | ||
Run create_pvr.exe or type the command yourself from command.txt, its all the same. | # Now you have all this : [[File:0gdtex_tut_12.png|frameless|border]] | ||
# Run create_pvr.exe or type the command yourself from command.txt, its all the same. | |||
Before you do. Check to see if the alpha.bmp lines up well with your created image, the outside should be perfect AS-IS but the inner circle may change depending on your source image, or if you even want your image to hole or not. | #Before you do. Check to see if the alpha.bmp lines up well with your created image, the outside should be perfect AS-IS but the inner circle may change depending on your source image, or if you even want your image to hole or not. | ||
#rename disc.pvr to 0GDTEX.PVR | |||
rename disc.pvr to 0GDTEX.PVR | #Then use that file from the video above. good luck | ||
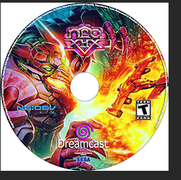
#Result: [[File:0gdtex_tut_13.png|frameless|border]] | |||
Then use that file from the video above. good luck | <br> | ||
---- | |||
Result: | Image Gallery: (idk what im doing) | ||
<br> | |||
<gallery mode="packed-hover"> | |||
Image:0gdtex_tut_1.jpg|''[[commons:Astronotus ocellatus|Astronotus ocellatus]]'' (Oscar) | |||
Image:0gdtex_tut_2.png|''[[commons:Salmo salar|Salmo salar]]'' (Salmon Larva) | |||
Image:0gdtex_tut_3.png|''[[commons:Epinephelus lanceolatus|Epinephelus lanceolatus]]'' (Giant grouper) | |||
Image:0gdtex_tut_4.png|''[[commons:Pterois volitans|Pterois volitans]]'' (Red Lionfish) | |||
Image:0gdtex_tut_5.png|''[[commons:Macropodus opercularis|Macropodus opercularis]]'' (Paradise fish) | |||
Image:0gdtex_tut_6.png|''[[commons:Canthigaster valentini|Canthigaster valentini]]'' (Valentinni's sharpnose puffer) | |||
Image:0gdtex_tut_7.png|[[Image:POTY ribbon 2007.svg|25px]] ''[[commons:Dactylopterus volitans|Dactylopterus volitans]]'' (Flying gurnard) | |||
Image:0gdtex_tut_8.png|''[[commons:Semicossyphus pulcher|Semicossyphus pulcher]]'' (California Sheephead) | |||
Image:0gdtex_tut_9.png|''[[commons:Category:Pseudorasbora parva|Pseudorasbora parva]]'' (Topmouth gudgeon) | |||
Image:0gdtex_tut_10.png|''[[commons:Category:Pterois antennata|Pterois antennata]]'' (Antennata Lionfish) | |||
Image:0gdtex_tut_11.png|''[[commons:Novaculichthys taeniourus|Novaculichthys taeniourus]]'' | |||
Image:0gdtex_tut_12.png|''[[commons:Synchiropus splendidus|Synchiropus splendidus]]'' (Mandarin fish) | |||
Image:0gdtex_tut_13.png|''[[commons:Psetta maxima|Psetta maxima]]'' (Turbot) | |||
</gallery> | |||
Latest revision as of 00:42, 10 January 2020
Info
Creation Tutorial
Author: HaydenKow
Source: Reddit Post
Files: 0GDTEX Creation Tool.7z |border|50px Video Overview from Super Retrocade
- watch this for an overview and the basic how to for the whole thing
- - How to add album art to GDEMU (YouTube)
- - It will absolutely work, and is a solid good with easy to find tools.
Making a better quality PVR Image using photoshop
- - Note: using the way discussed in the video above will give decent to find results but this gives you better control
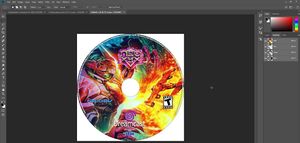
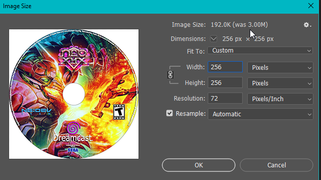
- Find an image and get it in photoshop :
- Resize to 256x256 :

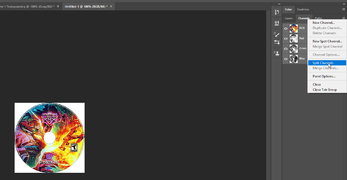
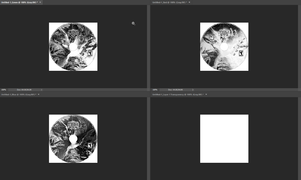
- Split channels:
 what you should get
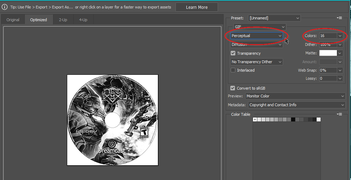
- Press Alt + Shift + Ctrl + S or Save for Web (Legacy):
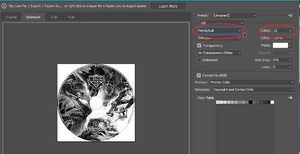
- For each channel, but should do it for all just doing it once.
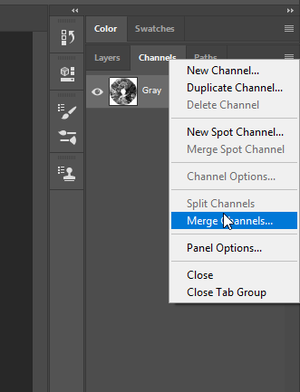
- Merge Back :
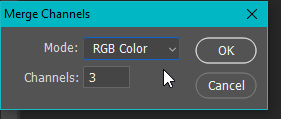
- Change to RGB, 3 Channel :
- Make sure this looks correct and not stupid:
- Back in business! :

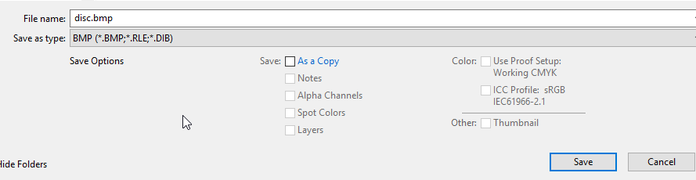
- Save as BMP :
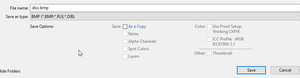
- Normal, dont go crazy :
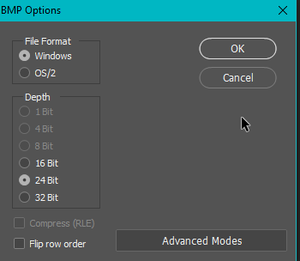
- Now you have all this :
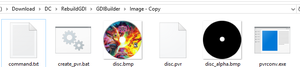
- Run create_pvr.exe or type the command yourself from command.txt, its all the same.
- Before you do. Check to see if the alpha.bmp lines up well with your created image, the outside should be perfect AS-IS but the inner circle may change depending on your source image, or if you even want your image to hole or not.
- rename disc.pvr to 0GDTEX.PVR
- Then use that file from the video above. good luck
- Result:
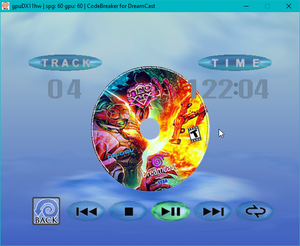


Image Gallery: (idk what im doing)

Astronotus ocellatus (Oscar)
Salmo salar (Salmon Larva)
Epinephelus lanceolatus (Giant grouper)
Pterois volitans (Red Lionfish)
Macropodus opercularis (Paradise fish)

Canthigaster valentini (Valentinni's sharpnose puffer)
File:POTY ribbon 2007.svg Dactylopterus volitans (Flying gurnard)

Semicossyphus pulcher (California Sheephead)
Pseudorasbora parva (Topmouth gudgeon)
Pterois antennata (Antennata Lionfish)

Synchiropus splendidus (Mandarin fish)

Psetta maxima (Turbot)