Visual Studio Code: Difference between revisions
m (→Preparation) |
m (→VSCode Setup: removed unnecessary TODO text) |
||
| Line 17: | Line 17: | ||
## If you are using WSL (Windows Subsystem for Linux), also install: | ## If you are using WSL (Windows Subsystem for Linux), also install: | ||
### [https://marketplace.visualstudio.com/items?itemName=ms-vscode-remote.remote-wsl WSL from Microsoft] | ### [https://marketplace.visualstudio.com/items?itemName=ms-vscode-remote.remote-wsl WSL from Microsoft] | ||
# (Not recommended at this moment:) | # (Not recommended at this moment:) | ||
## ([https://marketplace.visualstudio.com/items?itemName=ms-vscode.makefile-tools Makefile Tools] from Microsoft: the current version (June 2023) is not really adapted for remote debugging) | ## ([https://marketplace.visualstudio.com/items?itemName=ms-vscode.makefile-tools Makefile Tools] from Microsoft: the current version (June 2023) is not really adapted for remote debugging) | ||
Revision as of 10:55, 11 June 2023
This is a guide to setup your Visual Studio Code project with debugging support on both on a real Dreamcast and with an emulator.
Prerequisites
To start with, this tutorial makes the following assumptions:
- You have already installed and set up your KallistiOS development environment]
- if you want to be able to debug, be sure to compile gdb as specified on that page
- You have already downloaded and installed Visual Studio Code (version 1.78.2 was used for this tutorial)
VSCode Setup
- Launch Visual Studio Code
- (optional but recommended) To keep your configuration settings, plugins, ... specific to Dreamcast projects only:
- Create a "Profile" (Menu: File-Preferences-Profiles) called "Dreamcast"
- Install the following extensions: (Menu: View-Extensions)
- Required:
- C/C++ from Microsoft
- Optional:
- If you are using WSL (Windows Subsystem for Linux), also install:
- (Not recommended at this moment:)
- (Makefile Tools from Microsoft: the current version (June 2023) is not really adapted for remote debugging)
Setup per Project
Compilation
Preparation
(all the following steps happen in Visual Studio Code)
- Open the folder containing your project - eg: /opt/toolchains/dc/kos/examples/dreamcast/2ndmix:
- If you are using WSL:
- "F1" - "Connect To WSL"
- Menu: File-Open Folder...
- If you are using WSL:
- (if you are using Profiles) Make sure that the "Dreamcast" profile is selected (Menu: File-Preferences-Profiles)
- If you are using WSL, check that the C/C++ extension is correctly installed for WSL - if you get a warning like "install in WSL: Ubuntu", do so.
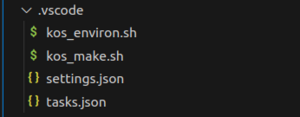
- Create a new subfolder ".vscode"
- insert the following files in the ".vscode" subfolder:
- kos_environ.sh
#!/bin/bash

#set the KOS environtment variables
source /opt/toolchains/dc/kos/environ.sh
- kos_make.sh
#!/bin/bash

#set the KOS environtment variables
source /opt/toolchains/dc/kos/environ.sh

make

exit
- settings.json
{
    "C_Cpp.default.includePath": [
        "${workspaceFolder}/**",
        "/opt/toolchains/dc/kos/include",
        "/opt/toolchains/dc/kos/kernel/arch/dreamcast/include",
        "/opt/toolchains/dc/kos/addons/include",
        "/opt/toolchains/dc/kos-ports/include"
    ],
    "C_Cpp.default.defines": [
            "_arch_dreamcast"
    ],
    "C_Cpp.default.compilerPath": "/opt/toolchains/dc/sh-elf/bin/sh-elf-gcc",
    "C_Cpp.default.cStandard": "c11",
    "C_Cpp.default.cppStandard": "c++17",
    "C_Cpp.default.intelliSenseMode": "",

    "terminal.integrated.defaultProfile.linux": "kos-bash",
    "terminal.integrated.profiles.linux": {
        "kos-bash": {
            "path": "/usr/bin/bash",
            "args": ["--init-file", "${workspaceFolder}/.vscode/kos_environ.sh" ],
            "overrideName": true
        }
    }
}
- tasks.json (This makes sure that the code is compiled before launching the debug session)
{
    "version": "2.0.0",
    "tasks": [
        {
            "label": "Build",
            "type": "process",
            "command": "bash",
            "args": [
                "--init-file", "${workspaceFolder}/.vscode/kos_make.sh"
            ],
            "group": {
                "kind": "build",
                "isDefault": true
            },
        },
    ]
}
The result should look like this: TODO: replace image without c_cpp_properties.json
At this point, you should be able to compile applications for the Dreamcast!
Compilation
You can compile via 2 ways:
- via the VSCode Command Palette - "Tasks: Run Build Task", or
- by opening a "kos-bash" terminal (Menu: View-Terminal if not visible yet, then click on the "+" to see the terminals to choose from, and select "kos-bash"), and typing "make"
In both cases, the compilation should generate an executable file, ending with .elf
Note: "kos-bash" is a bash shell with the "source /opt/toolchains/dc/kos/environ.sh" already executed for you. It should be your default shell in VSCode as long as you used the settings.json mentioned above.
Running a program
For this, we will use the "make run" command that you can find in many (all?) Makefiles of the KallistiOs project, to send and run the program on a real dreamcast:
- Typically, one of the following tools is used to run a program for the Dreamcast:
- on a real Dreamcast:
- via an ethernet cable & a Broadband (BBA) or LAN adapter: dcload-ip
- via a coder's cable & the serial port of the Dreamcast: dcload-serial
- on an emulator, like lxdream-nitro
- Make sure that the KOS_LOADER variable in /opt/toolchains/dc/kos/environ.sh is configured correctly:
- for dcload-ip (example if the IP of the Dreamcast is 192.168.1.210):
export KOS_LOADER="dc-tool-ip -t 192.168.1.210 -x"
- for dcload-serial (example if the Dreamcast is on serial port /dev/ttyS0):
export KOS_LOADER="dc-tool-ser -t /dev/ttyS0 -x"
- for the emulator (example with lxdream-nitro):
export KOS_LOADER="/opt/toolchains/dc/lxdream-nitro/builddir/lxdream-nitro -e"
- If want to run it on a real Dreamcast, power it on with the dcload disc loaded, and wait for the blue screen
- Open a "kos-bash" terminal, and type: make run
- The program will be running on your Dreamcast or on the emulator !
- (If you ran the 2ndmix example, you can press the START button on the Dreamcast pad to exit)
- Note: be sure to not have a gdb_init(); line added in your code when you only want to run a program & not debug it.
Debugging
Preparation
- Make sure that you compiled gdb for the Dreamcast, ie /opt/toolchains/dc/sh-elf/bin/sh-elf-gdb should exist (cfr prerequisites)
- Debugging in Visual Studio Code is configured in a .vscode/launch.json file. You can add as many debugging configurations as you want inside that launch.json file, eg 1 for debugging on a dreamcast, 1 for debugging on an emulator, ...
- insert the following files in the ".vscode" subfolder:
- launch.json (example with the IP of the Dreamcast = 192.168.1.210 for the BBA/LAN or /dev/ttyS0 for the serial cable):
{
    "version": "0.2.0",
    "configurations": [
        {
            "name": "BBA_LAN",
            "type": "cppdbg",
            "request": "launch",
            "preLaunchTask": "Build",
            "cwd": "${workspaceFolder}",
            "program": "${workspaceFolder}/${workspaceFolderBasename}.elf",
            //"program": "${workspaceFolder}/2ndmix.elf",
            "MIMode": "gdb",
            "miDebuggerPath": "/opt/toolchains/dc/sh-elf/bin/sh-elf-gdb",
            "miDebuggerServerAddress":"localhost:2159",//common misconception: we connect to the gdb server offered by dc-tool-ip, NOT to the Dreamcast directly !
            "debugServerPath":"/opt/toolchains/dc/bin/dc-tool-ip",
            "debugServerArgs": "-g -t 192.168.1.210 -x ${workspaceFolder}/${workspaceFolderBasename}.elf",
            //"debugServerArgs": "-g -t 192.168.1.210 -x ${workspaceFolder}/2ndmix.elf",
            //"stopAtEntry": true,
            "externalConsole": false,
            "avoidWindowsConsoleRedirection": false,
            "internalConsoleOptions": "openOnSessionStart",
        },
        {
            "name": "SERIAL",
            "type": "cppdbg",
            "request": "launch",
            "preLaunchTask": "Build",
            "cwd": "${workspaceFolder}",
            "program": "${workspaceFolder}/${workspaceFolderBasename}.elf",
            //"program": "${workspaceFolder}/2ndmix.elf",
            "MIMode": "gdb",
            "miDebuggerPath": "/opt/toolchains/dc/sh-elf/bin/sh-elf-gdb",
            "miDebuggerServerAddress":"localhost:2159",//common misconception: we connect to the gdb server offered by dc-tool-ser, NOT to the Dreamcast directly !
            "debugServerPath":"/opt/toolchains/dc/bin/dc-tool-ser",
            "debugServerArgs": "-g -t /dev/ttyS0 -x ${workspaceFolder}/${workspaceFolderBasename}.elf",
            //"debugServerArgs": "-g -t /dev/ttyS0 -x ${workspaceFolder}/2ndmix.elf",
            //"stopAtEntry": true,
            "externalConsole": false,
            "avoidWindowsConsoleRedirection": false,
            "internalConsoleOptions": "openOnSessionStart",
        },
        {
            "name": "LXDream",
            "type": "cppdbg",
            "request": "launch",
            "preLaunchTask": "Build",
            "cwd": "${workspaceRoot}",
            "program": "${workspaceFolder}/${workspaceFolderBasename}.elf",
            //"program": "${workspaceFolder}/2ndmix.elf",
            "miDebuggerPath": "/opt/toolchains/dc/sh-elf/bin/sh-elf-gdb",
            "setupCommands": [{
                "text": "set architecture sh",
                "description": "Set GDB Arch to SuperH",
                "ignoreFailures" : false,
            }],
            "miDebuggerServerAddress": ":9999",
            // path to lxdream-nitro
            "debugServerPath": "PATH_TO_LXDREAM",
            // lxdream-nitro flags
            "debugServerArgs": "--log=DEBUG --gdb-sh4=9999 -A null -e ${workspaceRoot}/${workspaceFolderBasename}.elf -n",
            //"debugServerArgs": "--log=DEBUG --gdb-sh4=9999 -A null -e ${workspaceRoot}/2ndmix.elf -n",
            "filterStdout": true,
            "filterStderr": true,
            // run on connect
            "stopAtConnect": false,
            // stop at main
            "stopAtEntry": true,
            "externalConsole": false,
            "avoidWindowsConsoleRedirection": false,
            "internalConsoleOptions": "openOnSessionStart",
            "launchCompleteCommand": "exec-run",
            "serverStarted": "SH4 GDB server running on port",
            "useExtendedRemote": true
        }
    ]
}
Note that for the 3 launch configurations above, you have 2 lines for "program" and "debugServerArgs", one of which is commented out. ${workspaceFolderBasename} is the name of your project directory (eg: 2ndmix), and if that matches the name of your target .elf file (eg: 2ndmix.elf), then you can use ${workspaceFolderBasename}. If not, you can just use the other line by replacing ${workspaceFolderBasename} with the real .elf filename.
You'll also need to replace "PATH_TO_LXDREAM" with the path to the emulator installed on your pc.
Launching a Debug session
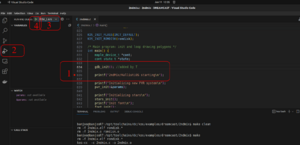
- put a line to initialize gdb in your code (1):
gdb_init();
TODO: conditional include
- insert a breakpoint AFTER this gdb_init(); line (1). You can't put a breakpoint before or on this line !
- If want to run it on a real Dreamcast, power it on with the dcload disc loaded, and wait for the blue screen
- Click on the "Debugger" icon (2) on the left
- Select the configuration you want to launch (BBA_LAN, SERIAL, or LXDream)(3)
- Click on the green arrow ("Start Debugging" - F5)(4)
Troubleshooting Tips
- If the dc-tool app does not seem to react anymore:
sudo netstat -ap | grep :2159
sudo kill <pid>

