NxDoom: Difference between revisions
(Created page with "{| border="0" cellpadding="2" cellspacing="1" align="right" style="margin-left:1em; background:#CADCFB;" !colspan="3" | {{{name|NxDoom}}} |- border="0" cellpadding="2" cellspa...") |
|||
| (One intermediate revision by the same user not shown) | |||
| Line 93: | Line 93: | ||
* Doom 2 XM Music - [http://dcemulation.org/1-newsdump/ports/nxDoom/chipdm2.zip Zipfile] - Rename to'' 'doom2_xm.wad'. | * Doom 2 XM Music - [http://dcemulation.org/1-newsdump/ports/nxDoom/chipdm2.zip Zipfile] - Rename to'' 'doom2_xm.wad'. | ||
== | ==How to make your own XM music wads== | ||
* [[ | ==Needed Programs== | ||
There are many different ways of doing this, so I have tried to provide the simplest way of accomplishing the task. | |||
For this tutorial, use these 3 programs on a 32bit Windows XP/Vista OS. | |||
* [http://www.doomworld.com/idgames/index.php?id=11946 WinTex 5.0] ''(You may require .dll files)'' | |||
* [ftp://drsleep@server1.thefourwinds.net/data/xwe.zip eXtendable Wad Editor 1.16] - [http://www.speedyshare.com/357424336.html Mirror] | |||
* [http://pweb.jps.net/~olivierl/utils/mpt116.zip ModPlug Tracker 1.16] - [http://download.cnet.com/MODPlug-Tracker/3000-2646_4-9029.html Mirror] | |||
==Step One: ''Extraction of music files from WAD''.== | |||
*Start WinTex. | |||
*For the purpose of this tutorial, the main wad does not need to be selected, so choose cancel at this prompt. | |||
[[Image:WinTex_1.png|140px]] | |||
*In the "PWAD to examine or modify" window, navigate to the WAD you wish to extract the music files from. Click on the "Edit PWAD" button. | |||
[[Image:WinTex_2.png|140px]] | |||
*If you wish, click on cancel to stop WinTex from displaying it's tutorial prompts. | |||
[[Image:WinTex_3.png|140px]] | |||
*At this window, select the music from the menu, or the button. | |||
[[Image:WinTex_4.png|140px]] | |||
*Highlight all the entries that appear in the list on the left. Then through the "Edit" menu select the "Save entries to file" option. | |||
[[Image:WinTex_5.png|140px]] | |||
*In this window, navigate to the folder you wish to save the individual music files to. Leave the names at their defaults, and click "Okay" for each. | |||
[[Image:WinTex_6.png|140px]] | |||
==Step Two: ''Conversion of music files''.== | |||
*Start ModPlug Tracker. | |||
*Under "File>Open", or the "Open" icon, select a MIDI file to begin. | |||
[[Image:MPT_1.png|140px]] | |||
*Here you can adjust several settings, including the master volume slider, or check the filter options. | |||
[[Image:MPT_2.png|140px]] | |||
*Click on the "Change" button. In the following window, without changing the "Module Type" option, reduce the channels all the way down to "4". Click "Okay". | |||
[[Image:MPT_3.png|140px]] | |||
*This window will pop up showing the unused channels already checked. Make note of it, and click "Cancel". | |||
[[Image:MPT_4.png|140px]] | |||
*Click on the "Change" button a second time. In the channels option select the amount of channels found from the previous step. Under "Module Type" select either '''IT''' ''(Okay)'', or '''XM''' ''(Best Option)''. | |||
[[Image:MPT_5.png|140px]] | |||
*Select "Okay" at this prompt. | |||
[[Image:MPT_6.png|140px]] | |||
*Click on the "Patterns" tab, select the last pattern (the number on the far right), and scroll down to where the last note can be found. In that row, or the one below it, enter "B00" as shown in the picture. This is to loop the track at the end. | |||
[[Image:MPT_7.png|140px]] | |||
*Now go to "Edit>Cleanup>Cleanup Song" and select it. Choose "Yes", and "Okay" to any following prompts. | |||
[[Image:MPT_8.png|140px]] | |||
*Go to "File>Save As", or click on the "Save" button. Leaving the name as the default, choose where to save it. | |||
[[Image:MPT_9.png|140px]] | |||
That's '''one''' music track. Repeat these conversion steps for '''each''' MIDI track in the set. | |||
==Step Three: ''Inserting converted music into a WAD''.== | |||
*Start XWE. | |||
*For the purposes of this tutorial, the main wad doesn't need selected, so choose "Cancel". | |||
[[Image:XWE_1.png|140px]] | |||
*Select the option "File>New". | |||
[[Image:XWE_2.png|140px]] | |||
*Choose where to save the new WAD file. Music WADs created for the vanilla Doom, Doom II, TNT, and Plutonia wads will '''autoload''' if named '''"DOOM1_XM.WAD"''', '''"DOOM2_XM.WAD"''', '''"TNT_XM.WAD"''', and '''"PLUT_XM.WAD"''' respectively. All other music wads, like for '''mods''', can be named to whatever you feel appropiate. | |||
[[Image:XWE_3.png|140px]] | |||
*From the menu, select "Entry>Load". | |||
[[Image:XWE_4.png|140px]] | |||
*Navigate to where you have your IT, or XM, music files stored. Highlight all the needed tracks, and click on "Open". | |||
[[Image:XWE_5.png|140px]] | |||
*Finalize the music wad just by closing it in XWE, or exiting XWE completely. You can delete this backup that it auto-creates. | |||
[[Image:XWE_6.png|140px]] | |||
==Step Four: ''Testing the Music WAD''. ''(Optional)''== | |||
*Test the music wad, for proper looping, effects, etc... by dropping it into a port like zDoom's main folder. With the intended main wad in the same folder, drag and drop the music wad onto the zDoom executable. | |||
[[Image:ZDoomTest.png|140px]] | |||
==Notes== | |||
''I may expand on this later to inlcude alternative soundfonts.'' If you have any questions regarding this tutorial, or are having trouble following it, please feel free to PM me in the forums. - Stryfe | |||
==Links== | ==Links== | ||
*Forum | *Forum | ||
**[http://dcemulation.org/phpBB/viewtopic.php?f=14&t=96980&hilit=nxDoom Law56kers Nxdoom Collection Released!] | **[http://dcemulation.org/phpBB/viewtopic.php?f=14&t=96980&hilit=nxDoom Law56kers Nxdoom Collection Released!] | ||
Latest revision as of 06:57, 2 March 2023
| NxDoom | ||
|---|---|---|
| Homepage | Homepage | |
| Latest Version | Beta 2.2 | |
| Downloads | Plain Files | |
| Release Date | 10/31/02 | |
| Author | BlackAura | |
| Based on | Doom Source (GPL) DoomDC | |
| Best Available Port For this game? |
Best for Addons | |
| Active | No | |
| Refresh Rate | Unknown | |
nxDoom is a source port of Doom written by BlackAura.
To play this you need to insert your own doom .WAD files. We cannot distribute those here, but we can give links to the shareware (demo).
nxDoom is based on DoomDC by crt0 and DCGrendel.
NxDoom supports the registered and shareware versions of Doom, The Ultimate Doom, Doom II, and Final Doom. It supports PWADs and DeHackEd patches, but only emulates vanilla Doom's features. It has VMU saving, sound, and music when downloadable music WAD files are used.
Features
- Support for all versions of Doom
- Modlist
- 90% compatable PWAD loader
- 90% compatable DeHacked 3.0 loader
- VMU saving
- All controls mapped to the controller
- Music using add-on music packs
- Keyboard and Mouse support
- Limited BEX strings
Controls
Menu:
- Digital Pad → Moves the cursor around
- A → Select - Same as Enter on a PC
- B → Back - Same as Backspace on a PC
- X → No - Same as N on a PC
- Y → Yes - Same as Y on a PC
- Start → Turn menu off
Game:
- Analog Stick → Walk and Turn
- L/R Triggers → Strafe left/right
- Digital Pad → Change weapon
- A → Fire weapon
- B → Open door/use switch
- X → Open door/use switch
- Y → Toggle Automap
- Start → Bring up menu
AutoMap:
- Digital Pad → Pan the view
- A → Zoom in
- B → Zoom out
- X → Toggle follow mode
- Y → Toggle automap
- Start → Bring up menu
Other Ports
Easily configurable without much time, previous knowledge, or hassle, Doom4DC has the more user friendly setup, and BBA support. It currently does not have full dehacked support, so it is not the best single player option for wads requiring dehacked.
Downloads
- Beta 2.2 - Plain Files - 10/31/02
- Beta 2.1 - Plain Files - 09/08/02
- Beta 2.0 - Plain Files - 09/06/02
- Beta 1 - Plain Files - 08/11/2002
Wads
- Doom Shareware v1.9 - Zipfile
- Doom 1 XM Music - Zipfile - Rename to 'doom1_xm.wad'.
- Doom 2 XM Music - Zipfile - Rename to 'doom2_xm.wad'.
How to make your own XM music wads
Needed Programs
There are many different ways of doing this, so I have tried to provide the simplest way of accomplishing the task.
For this tutorial, use these 3 programs on a 32bit Windows XP/Vista OS.
- WinTex 5.0 (You may require .dll files)
Step One: Extraction of music files from WAD.
- Start WinTex.
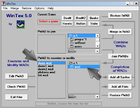
- For the purpose of this tutorial, the main wad does not need to be selected, so choose cancel at this prompt.
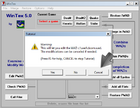
- In the "PWAD to examine or modify" window, navigate to the WAD you wish to extract the music files from. Click on the "Edit PWAD" button.
- If you wish, click on cancel to stop WinTex from displaying it's tutorial prompts.
- At this window, select the music from the menu, or the button.
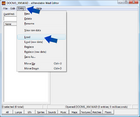
- Highlight all the entries that appear in the list on the left. Then through the "Edit" menu select the "Save entries to file" option.
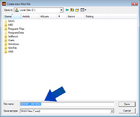
- In this window, navigate to the folder you wish to save the individual music files to. Leave the names at their defaults, and click "Okay" for each.
Step Two: Conversion of music files.
- Start ModPlug Tracker.
- Under "File>Open", or the "Open" icon, select a MIDI file to begin.
- Here you can adjust several settings, including the master volume slider, or check the filter options.
- Click on the "Change" button. In the following window, without changing the "Module Type" option, reduce the channels all the way down to "4". Click "Okay".
- This window will pop up showing the unused channels already checked. Make note of it, and click "Cancel".
- Click on the "Change" button a second time. In the channels option select the amount of channels found from the previous step. Under "Module Type" select either IT (Okay), or XM (Best Option).
- Select "Okay" at this prompt.
- Click on the "Patterns" tab, select the last pattern (the number on the far right), and scroll down to where the last note can be found. In that row, or the one below it, enter "B00" as shown in the picture. This is to loop the track at the end.
- Now go to "Edit>Cleanup>Cleanup Song" and select it. Choose "Yes", and "Okay" to any following prompts.
- Go to "File>Save As", or click on the "Save" button. Leaving the name as the default, choose where to save it.
That's one music track. Repeat these conversion steps for each MIDI track in the set.
Step Three: Inserting converted music into a WAD.
- Start XWE.
- For the purposes of this tutorial, the main wad doesn't need selected, so choose "Cancel".
- Select the option "File>New".
- Choose where to save the new WAD file. Music WADs created for the vanilla Doom, Doom II, TNT, and Plutonia wads will autoload if named "DOOM1_XM.WAD", "DOOM2_XM.WAD", "TNT_XM.WAD", and "PLUT_XM.WAD" respectively. All other music wads, like for mods, can be named to whatever you feel appropiate.
- From the menu, select "Entry>Load".
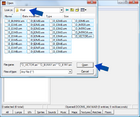
- Navigate to where you have your IT, or XM, music files stored. Highlight all the needed tracks, and click on "Open".
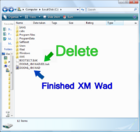
- Finalize the music wad just by closing it in XWE, or exiting XWE completely. You can delete this backup that it auto-creates.
Step Four: Testing the Music WAD. (Optional)
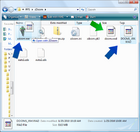
- Test the music wad, for proper looping, effects, etc... by dropping it into a port like zDoom's main folder. With the intended main wad in the same folder, drag and drop the music wad onto the zDoom executable.
Notes
I may expand on this later to inlcude alternative soundfonts. If you have any questions regarding this tutorial, or are having trouble following it, please feel free to PM me in the forums. - Stryfe
